This is the information page for the MorseMonkey Morse
code practice unit.

Click here to read/download the version 1.0.1 instrcutions.  This
software version supports repeating Iambic keying

Click here to read/download the version 1.0 instructions.This is the first board with the USB-C jack on it,

Click here to read/download further updated information about the "Koch" practice method in verion 0.99

Click here to read/download the updated version that support "Koch" practice method (Thanks to KJ5CBE for some corrections)

Click here to read/download the current instructions.
This is board 0.91 with the volume control.  The firmware is 0.95

Click here to read the first version of the instructions. This is board 0.9
NOTE:  Many PCBs have the designation "ver 0.91"
(Opps - I forgot to update the silkscreen on those boards)

The first boards do not have the volume control.
Use the instrutions at the bottom for board 0.9

The next boards have the volume control.
Use instrutions for 0.95 or 0.99

The next board has the USB power.
Use instructions for 1.0 or higher


Click here to watch Tank Radio's video of the first kit assembly

Firmware Files

Firmware files are simple text files which contain the addresses and HEX codes.
Download the file and save it to your local drive. 
Then use the update program described below to install the firmware
Now Available:
A small power adapter to eliminate the need for batteries.
Use with any USB MINI (not Micro, sorry) plug, or with the FTDI cable.  Works with both board versions.

Click here for the assembly instructions.

Contact me to order at KG5ANC at Unforscene. $5 each plus shipping (about $2)

Firmware update instructions

To perform this update, you will need the following:

  • FTDI TTL-234X-3V3 or TTL-232R-3V3with TTL output cable  (available at FTDI here or at Amazon or from DigiKey. )
  • 5 pin header (like these at Amazon, snap off 5 pins as needed)
  • Firmware loader application (below)


Notes about the cable:  the "R" is 2.4V logic levels, the "X" is 3. The 3V3 means it is for 3.3 volt logic, and the end is 0.1" single row spaced connector. 


Also, pin number three on the cable is still 5V.  It is unconnected on the MorseMonkey.  Do not attempt to power the unit with the cable, unless you fabricate your own regulator)

Download and unzip the firmware loader application.  There is no installer or additional requirements.

The application will run from a command line.

Unzip the downloaded file.  There is only a single executable file inside.

Store the extracted executable file in the same location as the downloaded firmware file from above.
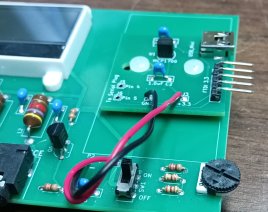
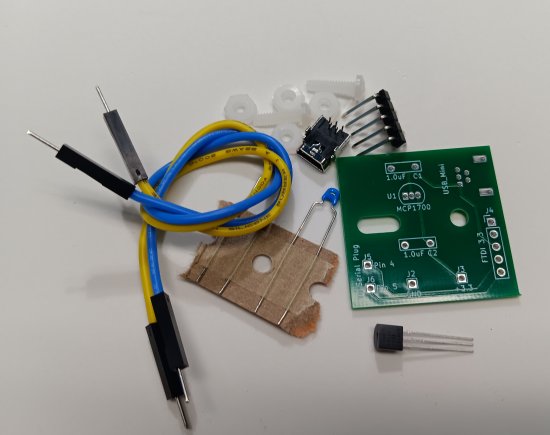
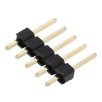
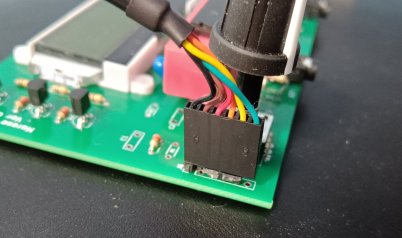
Install the 5 pin header in the postion next to the rotary dial. Solder the header in place, as you would when installing resistors.

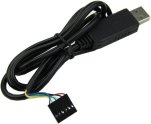
Attach the USB cable as shown, with the black wire toward the back and green wire toward the front.
Plug the USB Serial cable into your PC. Windows should detect the new device and automatically install the software.
(If Windows does not install the device driver, you can manually install it by downloading it from https://ftdichip.com/drivers/ )

To verify the device is present, right click on the "My Computer" and select "Manage, or simply search for "device manager"

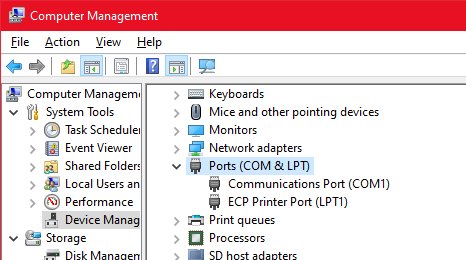
Shown at right are the device manager "Port (COM & LPT)"
The top image is before the USB serial cable is installed.
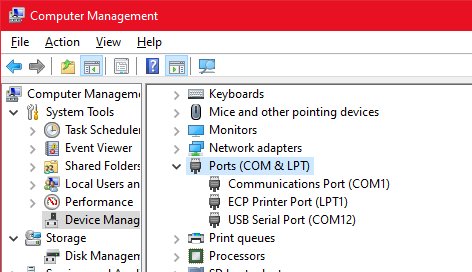
The lower image is the USB serial cable and COM number.

Note the COM number in parenthesis as you will need it later
Before the USB driver is installed
After the USB cable is connected and driver is installed
Start a command prompt with "cmd.exe".   A command prompt window should appear.

Navigate to the location that you saved the downloaded ZIP file.


INSURE THE UNIT IS ON AND HAS FRESH BATTERIES
This process can take up to 15 minutes.


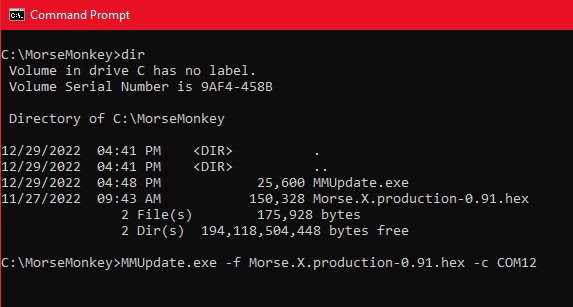
Execute the command show below:
MMUpdate.exe -f Morse.X.production-0.91.hex -c COM12

where -f supplies the name of the firmware file, and -c supplies the name of the COM port which was identified in the previous step.

The application will report progress, and inform you when it is completed.
Once completed, turn off the unit, and turn it back on.

Copyright 2022
Designed by kg5anc